

How To Make Flying Debris In Photoshop
This chapter is from the book
Debris and Dust
Debris and grit are something you oft see in movie posters when there'due south a lot of activity and explosions. As always with Photoshop, there are countless ways to create this debris and dust effect.
Creating the Brush
- Create a new certificate: become to File > New, make the dimensions 1500px width and 1500px height, set the resolution to 240ppi, and for Groundwork Contents choose anything other than Transparent. Click OK.
-
And then go to Filter > Noise > Add Noise, set up Corporeality to 400%, fix Distribution to Gaussian, and select the Monochromatic checkbox (Effigy 4.14).
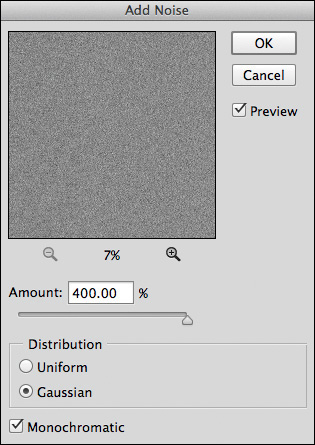
Figure 4.14
-
For this result to work we need to make the dissonance bigger. Choose the Rectangular Marquee tool, Shift-click, and elevate out a square in the centre of the certificate (Figure four.15).
- Re-create this selection onto its ain layer by pressing Command/Ctrl+J. Then get to Edit > Costless Transform, Shift+Option/Alt-click whatever corner transform handle and drag outward so that the square fills the document. As a issue, the size of the racket has been increased. Flatten the layers by going Layer > Flatten Paradigm.
-
Get to Filter > Filter Gallery, and then to Stylize > Glowing Edges. Hither is where you can experiment with the Edge Width, Edge Effulgence, and Smoothness settings to create random shapes that will pass as being debris. In this instance I plant that setting Edge Width to 14, Edge Brightness to 20, and Smoothness to 1 worked bang-up (Figures four.sixteen and 4.17).
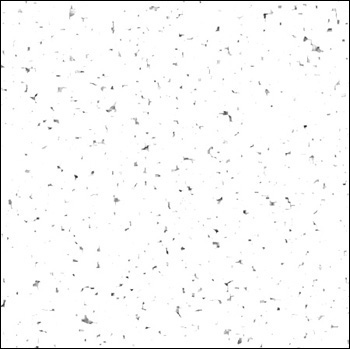
Figure iv.17
-
Click OK to close the Filter Gallery, and then press D to set the foreground and groundwork colors to their default of black and white. Press X and then that white becomes the foreground colour. Choose the Gradient tool from the toolbar and, in the options at the top of the screen, select the Foreground to Transparent from the Gradient Picker, and the Linear gradient as in Figure 4.eighteen.
-
Elevate inwards from each side (left, right, top, and bottom) and from the corner of the document several times. This volition cover the debris that is besides shut to the edge and ensure that there are no straight lines (Figure four.xix). Then go to Prototype > Adjustments > Levels, click the Blackness Betoken sampler icon (Figure 4.20). Zoom in on the document and click any of the debris shapes (this darkens them all so that they stand out more). Click OK to shut the Levels Adjustment dialog.

Figure iv.19 The result of using several gradients to remove the debris from the edges and to remove whatever direct lines
-
Choose Edit > Define Brush Preset, name the brush Debris, and click OK. Choose the Brush tool (B), and in the options at the top of the screen click to open the Brush Preset Picker. The brush we but created volition appear equally the very last in the listing. Click this new brush to select it, click the gear icon in the top correct of the Brush Preset Picker properties to open a menu (Figure 4.21), and choose Save Brushes.
-
Proper name the brush set Particles, and click OK.
The Particles brush set, which contains the Droppings brush, is now stored for future utilize and will appear in the Brush Preset Picker'south list of brushes (Figure 4.22), meaning you tin can share it and export it. (Brush sets are a great manner to keep like brushes together.)
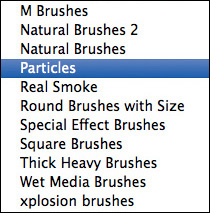
Figure four.22 The Particles brush set is now stored in Photoshop for future employ.
Saving Brush Presets
At present we can brand some adjustments in the Brush panel to brand the Particles brush await and behave as we want it to.
-
Cull the Castor tool (B), and from the Brush Preset Picker choose the Particles brush. Click the Castor panel icon (Figure 4.23).
-
In Brush Tip Shape, gear up Spacing to 60%. In Shape Dynamics, set Size Jitter to 5% and Angle Jitter to 100% (Figure 4.24). In Scattering, set Scatter to 25% and Count to 1. In Transfer, set Opacity Jitter to 65%.
-
To save these settings equally a preset, click the gear icon in the elevation right of the Castor panel properties and choose New Brush Preset (Figure 4.25). Name the preset Debris/Grit, and click OK.
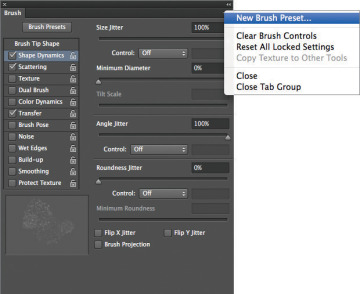
Figure 4.25 Saving brush settings as a preset for futurity use
Using the Debris Castor
We'll now add depth using several layers.
- With an paradigm open in Photoshop that you want to add droppings to, add together a new bare layer to the elevation of the layer stack and name it droppings 1.
-
Use the Debris brush with a black foreground color to pigment the debris. Debris in the distance would exist pocket-sized because it is uttermost from the photographic camera, then to make it appear out of focus go to Filter > Convert for Smart Filters then to Filter > Mistiness > Gaussian Mistiness. I used a blur amount of 20 pixels (Figure four.26). Then click OK.
- Add together some other blank layer and proper noun information technology debris 2. Increment the size of the brush a picayune considering the droppings nearer to the camera would exist larger, and so apply a few brush strokes. Go to Filter > Catechumen for Smart Filters, and so to Filter > Blur > Gaussian Blur and use less mistiness than in the previous step. I applied a blur amount of 15 pixels. Click OK.
- Add together some other blank layer and name it droppings 3. This debris should exist slightly larger than the previous layer, so increase the size of the castor. Add together a small-scale amount of Gaussian Blur (5 pixels) so that it notwithstanding has the look of movement. Click OK.
-
Add another blank layer and name it debris four. This will be the debris nearest the camera. This debris needs to be largest of all, then increase the size of the brush to the maximum and employ a few castor strokes (if you desire the debris to be fifty-fifty bigger, use Edit > Free Transform and resize the contents of the layer). Finally, go to Filter > Catechumen for Smart Filters, so to Filter > Gaussian Mistiness and add a blur amount similar (if not slightly more than) to the amount you used on the debris 1 layer.
Source: https://www.peachpit.com/articles/article.aspx?p=2274037&seqNum=3
Posted by: gaskinmostelf.blogspot.com
0 Response to "How To Make Flying Debris In Photoshop"
Post a Comment